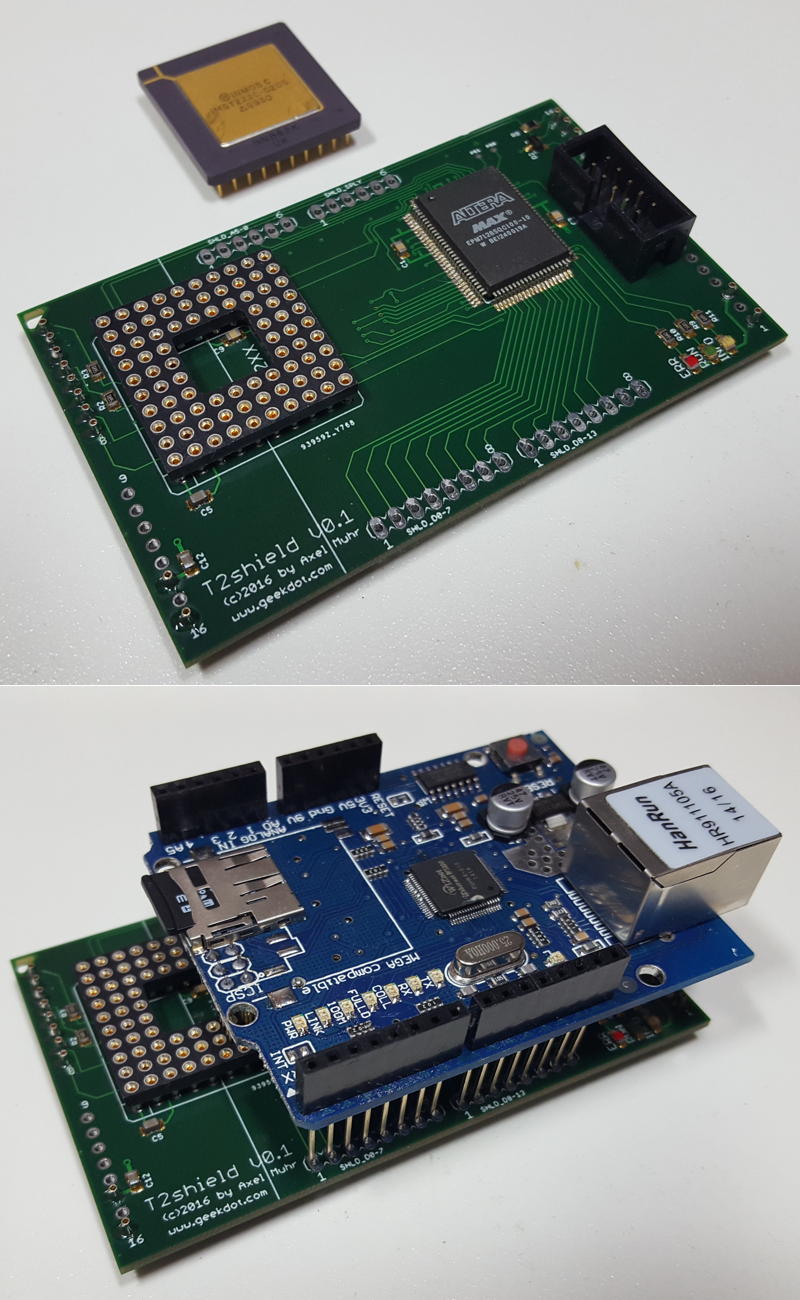
[The T2shield is currently a work-in-progress project – the first alpha hardware is operating but lots of coding lies ahead!!]
The idea for the T2shield was born when I thought about getting recent peripherals like SD-cards, Ethernet, displays etc. into a Transputer network.
Sure, there are the old, original TRAMs like the STM228 SCSI controller, the B431 Ethernet TRAM or quite some choice of graphics controllers. But they’re all rare like chicken teeth these days which means unaffordable when they rarely pop up on ePay.
Rebuilding them is also a no-no given the obsolete parts they’ve used… and to be honest: A noisy, vintage SCSI-1 drive isn’t what I thought of.
So after some time I came to the conclusion it will be the easiest and cheapest way to re-use what you can buy for a few bucks from China these days: Arduino shields.
As a lucky incident such a shield perfectly fits onto a size-2 TRAM – Yay!
Without much further ado, here is the T2shield (v0.1) with a shield loosely put on top to get an idea…
Arduino shields mainly use the SPI bus for data transfer. With its 10+Mbps SPI is much faster than e.g. I²C (which I used for my T2I2C TRAM) and can cope with fast(er) peripherals.
But this also ruled out a slow IMSC011/12 link-adapter design like the one used on the T2I2C. Also there’s no of-the-shelve SPI master controller to simply glue a bus to it.
So the design turned out much more advanced this time:
- A 16bit Transputer (with 64KB SRAM) handles the high OS-link speeds as well as the ‘glue’ like File/Ethernet handling.
- A comparably big CPLD (100pins, 128 marcocells) implements the SPI master controller as well as handles the T2xx memory- and interrupt-handling.
- All Arduino digital-pins and nearly all analog-pins are connected to the CPLD to adjust to any available shield.
Also this new TRAM design is a “first” for me in many aspects:
- 1st usage of a 16-bit T2xx Transputer (vs. 32bit)
- 1st serious utilization of a CPLD (besides the baby-steps taken with the T2A2)
- 1st Size-2 TRAM
Initial status
Transputer
[wppb progress =100 option=green] 100% done
A T222 Transputer is -after fixing some stupid errors- happily running and has control over his external RAM.
Here’s the first sign of life by RSPY (a brilliant ispy‘ish tool of Michael I really need to write a post about soon):
# Part rt Link0 Link1 Link2 Link3 RAM@cycle
0 T2 20 HOST ... ... ... 4K@1,56K@2|
That means: A T2xx @ 20mbps linkspeed is connected to the host (PC) and has 4K internal and 56K external RAM… wait a second! just 56K? Yes, that’s because the internal 4K overlaps and RSPY leaves the up-most 4K untouched as most peripherals are mapped there and poking there could create unwanted effects…
CPLD
[wppb progress =10 option=yellow] 10% done
All basic Transputer controls are in place, LEDs are controlled by the CPLD
TODO: Implement the SPI master in VHDL. That’s THE biggest challenge for me being a total VHDL noob. Again, I wouldn’t got this far already without the tremendous help from Michael Brüstle, my VHDL Jedi-Master.
Drivers
[wppb progress =100 option=red] 0% done
Write the (Helios) driver to handle file and/or network access. This should be (optimistically) be compatible to existing file- or Ethernet ‘servers’. This will probably be the most time consuming task.
Progress?
This is (also) the first time I’m posting about a project which is not finished. So I will keep you posted about the progress with new posts in this “T2shield” chapter of this wonderful little page.
If you do own
- a Transputer network
- a free size-2 TRAM slot
- a T2xx Transputer
- some VHDL/Occam/Helios driver skills & knowledge
shoot me a mail and I might provide you a T2shield to join the development.
That said, here’s a first little sign of life:
The Transputer writes numbers to a mem-mapped address (0xFC00) while the CPLD reads the lowest 2 bits and displays them by 2 of the 3 LEDs on the T2shield

