Ever thought about manufacturing PCBs in China?
If you google this, you most certainly end up with “your mileage my vary”. Indeed it does… and here are my 2 cents:
Because the grass might be greener on the other side of the river, I’ve tested and will keep on testing several PCB houses over the time. So I’ll update this Blog post every now and then… until now, I wrote about
ShenZhen2U
[Oct 2014]
For my AM-B404 TRAM I hadn’t had any other option than have them manufactured in China. 6 Layers and sub-20$ weren’t possible anywhere else. So I tried ShenZhen2U…
Ordering
After sending in the Eagle-CAD files their support was great. Several Mails with their engineer (Hi Iver!) flew back and forth, during which he created a multi-panel board out of my single board design and turned it into a Gerber file and let me having it for a final check before everything went into production.
Quality
Manufacturing and shipping was OKish (20 days in total). At first sight, everything looked great. Nice, professionally framed SMD stencil, PCBs etc were carefully bubble wrapped.
When squeezing the whole stack of PCB it felt a bit ‘bouncy’ – looking at it from the side, it became clear why:
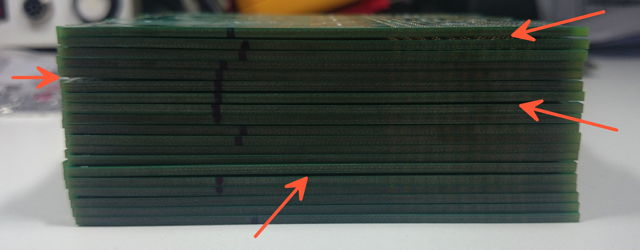
Some PCBs were bent. You can see the gaps between some of them.
Well, when the PCBs were from the 3-part panel separated it wasn’t that obvious anymore. So I started populating them.
This brought me to the next issue. The silkscreen was quite a bit off on some of the PCBs. Luckily, all of them had enough solder pad left to be usable:
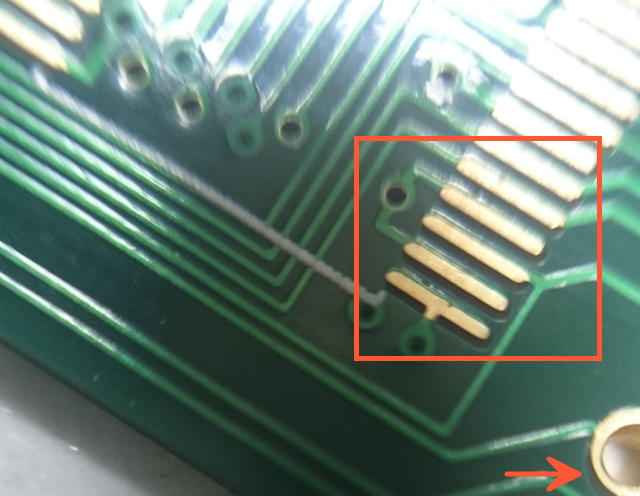
In the end, 3 of the 60 boards were completely unusable. They had shorts within the internal layers which couldn’t be fixed even by cutting traces and re-wiring.
I guess all those glitches are the price you have to pay when going “cheapo”.
Update Nov 2015:
I ran a 2nd batch of the same boards from the same Gerber files and mentioned the non-working boards in the 1st order.
This time the quality was very good and they silently added 2 extra boards to my order. Thumbs up, ShenZen2U!
Update March 2017:
I asked for a quote for the same design, same number of boards but their price increased 30% within 15 months – so I had to find another manufacturer capable of doing 6 layers.
Dirt Cheap PCBs
For my QFP-to-BGA adapter – which just uses 2 layers – I tried Dirt Cheap PCBs. I really like the attitude of their site and for just 25 bucks for 10 PCBs it was worth a shot.
Ordering
It’s a no-brainer. Upload your eagleCAD/Gerber file and wait – after some minutes you can even look at a rendering of the top- and bottom layer of your boards. They explicitly state, that this function is beta and yes, 1 of the ~5 times I used their service, that rendering wasn’t totally correct – so don’t wet your pants if this happens. Use a real Gerber viewer instead. That said, you normally have 1-2 days to update your files if I might have found a mistake later.
About 20 days later I got my little brown envelope. Everything’s fine, I’m totally OK with it.
Before using their service, be sure to check their FAQ. You’ll find jewels like this:
“The board house will add three tiny numbers to your board: batch ID, a customer number, and our PCB ID. This is so everyone knows which crappy PCBs to send you. Don’t like it? Tough. Buy an entire panel somewhere else.”
Update: I also tried their 4 layer service (for which they use an external board house) and while the price is good, the results were so-so.
They did not place the solder-mask on the most fine-pitch part (QFP 100pin) which is a pain in the a** to reflow without getting shorts 
Seeedstudio
A more posh version of manufacturing PCBs in China is Seeedstudio who asked me to check out their “Fusion” service. They even offered me a $30 coupon (thanks!), so why not give it a try?!
Before sending my Gerber files I had a couple of questions and their email service is very good an responsive.
As they offer hard-gold finishing, I thought it might be a good time to create an expansion card with its connectors being plated with hard-gold to make it more robust to plugging the card in and out a couple of 100 times… some mails flew back and forth but in the end they asked for the same price for having the connector-fingers done in hard-gold as having done the whole PCB done in this process (the rest was planned in HASL). That’s 30 vs 230 bucks! Erm, no thanks… not this time.
Ordering
So I ordered some standard 2-layer, HASL finished PCBs, no bells and whistles on Fri. Nov. 25th. Their order form is well designed and shouldn’t leave you with any questions – they even offer a Gerber viewer of your uploaded files, which I think is very cool!
(One hint: When entering your address, the form insists that you enter an EORI tax-number which private persons normally don’t have. A simple dash “-” does the trick, though).
They offer 3 ways of shipping, ~10€ for normal post (10+ days), DHL and FedEx (both 3+ days). I went for DHL – I’m pretty sure “normal post” wasn’t an option for my order when I had the choice. Maybe because of the weight…
Next day the boards went into production. You’ll be updated about the proceedings by mail – pretty standard today – as well as in you accounts order history on their page.
On Nov. 29th I got an email confirmation, that my PCBs are finished and shipped… and on Dec. 3rd I got the boards in my mailbox. That was blazing fast indeed! 9 days from ordering to receiving
Quality
The cool thing is, that I’ve ordered the predecessor of this design at “Dirt Cheap PCB”, so I have a direct comparison.
Given the simplicity of the design, I haven’t found any glitches or mistakes… the two boards are nearly identical.
If you’re super picky about your design: like Dirt Cheap PCB, Seeed does print some internal ID on your silkscreen – and that’s not in their FAQ.
Conclusion
For a simple design (2-4 layers, no extras) Seeedstudio is comparable to other PCB houses – even a tiny bit more expensive.
Where they shine is when it comes down to support and all those extra features like penalization, V-grooves etc. which the other houses just can’t offer or leave you in the cold when it comes down to getting help.
PCBWIN
So after ShenZen2U became too expensive for my budget (They’re still cheaper than European services) I found PCBWIN being another Chinese manufacturer able to provide 6 Layers for a reasonable price.
Ordering
The order process was very convenient. After requestin a quote online I’ve been contacted by my ‘personal sales assistant’ (Hi Betty!) straight away.
Their engineers checked my Gerber, clarified some measurements, v-groves etc. which I could explain by sending photographs and drawings. All in all, very a professional and reassuring process during which you also can contact your personal contact by Skype, e.g. if you’re really on a time-pressure.
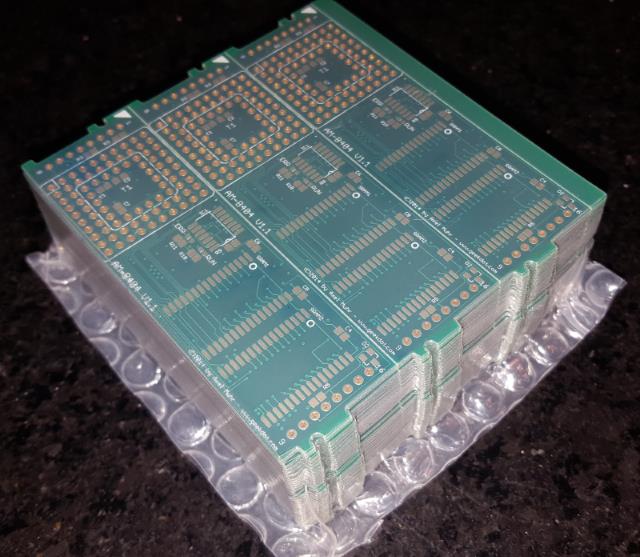
I can’t give a usual delivery time for this order, as my fell into the Quingming Festival season, so that added some extra days of delay – but they informed me about this, so all OK here! Including this delay, it took 10 days until shipping. After the usual 20 days wait and some more queuing at the customs office I got this:
Quality
The PCBs and a new stencil were well packed – and a quick visual check (ENIG, masks, printing) was quite satisfying. If there’s anything to critic, maybe the silkscreen printing was a bit ‘thin’ – but that’s really a minor thing. The first PCB I’ve populated and tested worked fine – so I assume the other 29 will be fine, too 
After-sales are great, too. So your personal assistant will stay in touch and is honestly interested in how everything worked out etc.
Conclusion
So as with any other PCB service, it’s the people that make the difference. Yeah, the price is an important item on the list, but as the saying goes: If you buy too cheap, you’ll buy twice.
For me PCBWIN was a win. Thumbs up!
Do you have/had any good/bad experiences with Chinese PCB manufacturers? I’m happy to hear about it in the comments below!


